

/https%3A%2F%2Fassets.over-blog.com%2Ft%2Ftwentyeleven%2Fimages%2Fpine-cone.jpg "Latest Tech News, Mac News, Android Devices, Popular Smart Phones, Camera and Camcorders and Useful Tips and Guides")
How to recover deleted videos from Samsung Galaxy S3
Published on October 29 2013
"I just got my Galaxy S3 a few days ago, Friday. I'm new to Android basically coming off of my "dumb" phone of 5 years. I can post pics if you guys want. So anyways, is there a way to recover lost videos? I have been Google'ing around and I know there are solutions out there, using recovery programs and such. Essentially I took a video, it went to my gallery, then I deleted it on accident.
Are there anyone to give me a way? Thanks for your help. I hope I can get this figured out."
It is not hard to find a data recovery program to recover your deleted videos from Samsung Galaxy S3. And here, I'd like to recommend Dr. Fone for Android who stands out as the most practical and powerful Samsung Data Recovery to help you fast and best recover deleted videos from Samsung Galaxy S3.
Dr. Fone for Android is able to recover deleted videos and photos, contacts and messages as well from Samsung Galaxy S3, besides, it can also recover deleted files from other Samsung devices such as Samsung Galaxy S4/S2/S, Samsung Galaxy Note 1/2/3, Samsung Galaxy Tablet etc.
Simple guide to recover deleted videos from Samsung Galaxy S3
After downloading and running Dr. Fone for Android, you'll see the main interface as follows, then, connect your Samsung Galaxy S3 to the computer via a USB cable.
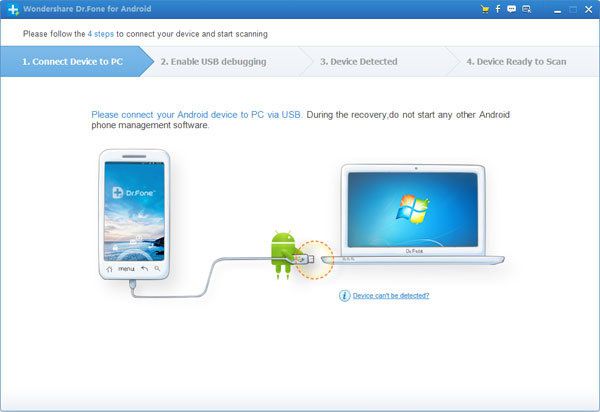
If your Samsung device isn't detected by the program, you need to enable USB debugging (or enable USB Storage Mode) on your phone. Check what Android OS is your Samsung and then choose the right way to open USB debugging follow below steps:
1) For Android 2.3 or earlier: Enter "Settings" < Click "Applications" <<strong> Click"Development" < Check "USB debugging" 2) For Android 3.0 to 4.1: Enter "Settings" < Click "Developer options" < Check"USB debugging" 3) For Android 4.2 or newer: Enter "Settings" < Click "About Phone"trong> < Tap"Build number" for several times until getting a note "You are under developer mode" < Back to "Settings" < Click"Developer options" < Check "USB debugging"

Once your Samsung is detected, the program will ask you to click the "Start" button to start analyzing your Samsung Galaxy S3.

Note: Before starting, make sure that your phone battery is more than 20% charged, so that you can get a smooth scan.
If your device is not rooted before, the program will directly scan it after the analysis.
Note: For the device that Wondershare Dr.Fone for Android doesn’t support currently, it may lead you to set USB Mass Storage on your device to scan photos, videos, music and documents, or to root your device by yourself (if there is no USB Mass Storage option). All rooted Android devices are supported well. You can choose to do it or not by yourself.
If you rooted your device before, you need to allow the program Superuser authorization on the screen of your device. Just click "Allow" when the message pops out on your device’s screen. Then back to your computer, and click "Start" on the program's screen to scan your device.

Note: For some devices, they may ask you to click "Allow" more than one time on your device's homescreen. It's normal. Just do it if it askes. It doesn't matter. Just click it until it doesn't appear again or the program has begun its real scan.
Do not disconnect your device during the scan, or the scan will fail.

After finishing the scanning process, a list of recoverable files that have been found from your Samung will be shown. In addition, there will be a preview window of files where you can preview the contacts, SMS, photos and videos from Samsung device. Mark those you want and click "Recover". You can selectively save them on your computer
