

/https%3A%2F%2Fassets.over-blog.com%2Ft%2Ftwentyeleven%2Fimages%2Fpine-cone.jpg "Latest Tech News, Mac News, Android Devices, Popular Smart Phones, Camera and Camcorders and Useful Tips and Guides")
How to recover deleted files on Mac
Published on October 31 2013
"How to recover deleted files on my Mac?My friend got evidence of paranormal activity in her house on tape, got scared, deleted the file, and emptied her trash bin. Now we want it back. How do you recover the deleted file on my Mac?" ----- Answers Yahoo
Trash, also known as Trash Bin or Recycle Bin, is designed on computer to temporarily store deleted files. Therefore you can either recover them if you deleted them accidentally or empty Trash later to release more space to save new files. Unfortunately, many people delete files and empty Trash immediately, some veteran Mac users even use Command+Delete to remove files directly. It means the files won't stay in Trash. But it turns out that there might be some files that you've emptied from Trash is what you want. In such cases.
Don't worry, you can still recover your deleted files on Mac with a third-party data recovery program if the files deleted are not overwritten by new files. Here, it is highly recommended to use Wondershare Data Recovery for Mac to recover deleted files on Mac
Wondershare Data Recovery for Mac is powerful enough to recover formatted, deleted and inaccessible images, archives, documents, songs, videos, etc. from Macbook, iPod and Mac desktop, USB drives, digital camera, mobile phones and other storage media.
Tips: Don't download and install any program in the place where you lost your files, for this could overwrite your lost data. Download and install it on another partition. If you need to recover deleted files on Windows, you can turn to Data Recovery for Windows.
Step by step to recover deleted files on Mac
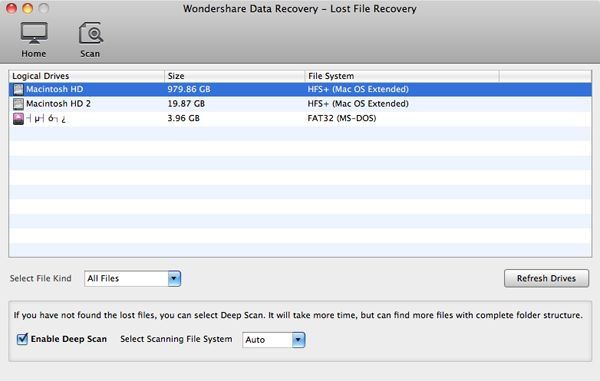
"Lost File Recovery" can undelete files from a partition or removable media, no matter deleted by Command + Delete or emptied from the Trash.
This recovery option is recommended at first, for it takes you only a few minutes to retrieve deleted files from Mac Trash. If you can't get deleted file in this mode, you can try "Raw Recovery" later, which can recover tons of files including those lost long time ago, more time consumed accordingly.
Select the logical drive where you deleted your files, if you have more than one drives on your Mac. Then click on "Scan" to search your deleted files.
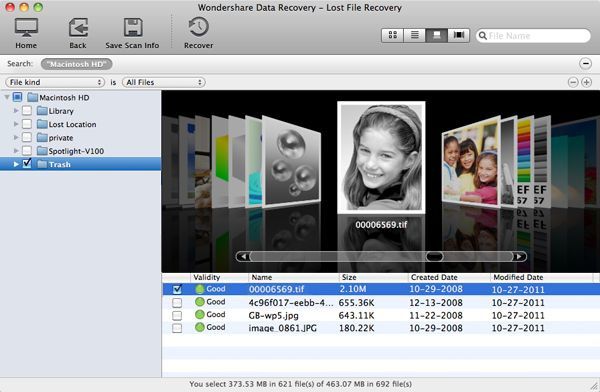
You are here now. When the scan finishes, all files you deleted are listed with the original path, no matter you deleted them directly from Library, desktop, or Trash, etc. Undoubtedly, files you emptied from Trash are in the "Trash" folder. Or you can search the file's name in the search bar on the top to retrieve it fast.
Before recovery, you can preview the file to make sure the files or quantity. Common image formats, documents and archives are allowed to preview directly.
Tips: During the scanning process, you can choose to "Pause" or "Stop" the work if you have found the files you are looking for in the list or you have to leave for a while. If you pause it, you can continue it any time when you are available. If stop, you don't need to drop the current scanning result, and you can save it on your computer for next time recovery by resuming it, which can save you much time.
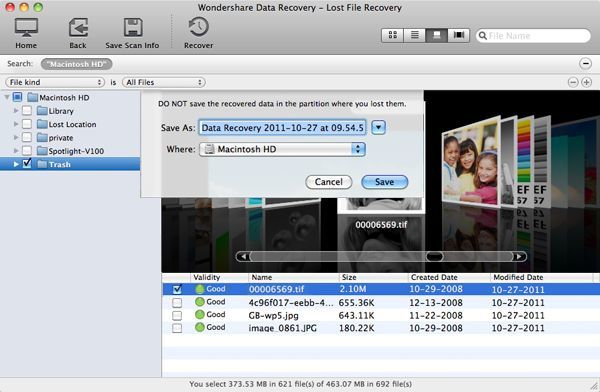
When checking the file for recovery, click on "Recover" to retrieve them.
What you should keep in mind is: don't save the recovered files on the same place where you lost them, in case you overwrite them. If you don't find all the files, the deleted files will be overwritten for your new files' storage.
Tips: Before "Empty Trash", please check the Trash Bin carefully. If you find some valuab, you can highlight the ones that got mistakenly sent there and drag them out of Trash Bin to avoid this data loss headache.