

/https%3A%2F%2Fassets.over-blog.com%2Ft%2Ftwentyeleven%2Fimages%2Fpine-cone.jpg "Latest Tech News, Mac News, Android Devices, Popular Smart Phones, Camera and Camcorders and Useful Tips and Guides")
How to recover deleted data from Android devices
Published on August 20 2013
Have you ever deleted or lost your precious data from your Android devices by accident? Are you struggling to find a proper program to help you recover your data from Android devices? Have you noticed that there are many programs online promising to recover deleted data from your Android devices, but don't know which one suitable for you?
Then, you can turn to Dr .Fone for Android, which is a professional Android Data Recovery that can directly recover deleted data such as deleted SMS text messages and contacts, photos, video, audio and documents lost due to deleting, restoring factory settings, flashing ROM, rooting, etc from SD cards inside Android devices such as.like Samsung, HTC, LG, Motorola, and so forth.
1. Automatically scan your device after connected to the computer; 2. Recover sent & received messages, and export both in HTML and XML formats to PC for easy reading, printing and importing to your device; 3. Retrieve deleted contacts, including names, numbers, Email & addresses, and export in HTML, vCard and CSV to PC; 4. Regain photos, video, audio and documents from SD cards inside Android devices to a computer.
Below are detailed steps to recover deleted data from Android devices
Step 1. Connect your Android device to PC
After launching Wondershare Dr.Fone for Android, you'll get the primary window below. Please connect your Android device to the computer via a USB cable.

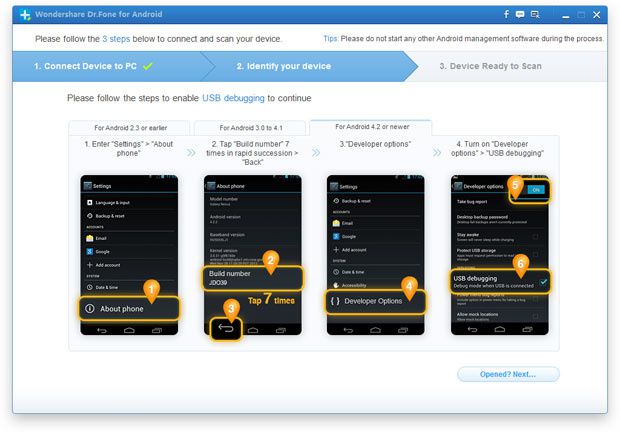
Step 2. Enable USB debugging
If you didn’t enable USB debugging on your device, you’ll see the window below. Follow the detailed expression in the window to set it now.
Note: If you have enabled USB debugging on your device before, you can skip this step.
1) For Android 2.3 or earlier: Enter "Settings" < Click "Applications" < Click "Development" < Check "USB debugging"

2) For Android 3.0 to 4.1: Enter "Settings" < Click "Developer options" < Check "USB debugging"

3) For Android 4.2 or newer: Enter "Settings" < Click "About Phone" < Tap "Build number" for several times until getting a note "You are under developer mode" < Back to "Settings" < Click "Developer options" < Check "USB debugging"
Note: If you still get this window and the USB debugging has been enabled, please try to disable it and reset it again.
Step 3. Begin analyzing and scanning the data on your device
After you get the USB debugging done, connect your device to the computer again, and it will detect your device. Click "Start" to analyze the data on your device.

Note: Before starting, please make sure that the battery is more than 20%, to ensure a complete scan.
If your device is not rooted before, the program will directly scan it after the analysis.
If you rooted your device before, you need to allow the program Superuser authorization on the screen of your device. Just click "Allow" when the message pops out on your device’s screen. Then back to your computer, and click "Start" on the program's screen to scan your device.

Note: If the program doesn't scan anything for a long time after you clicked "Allow" on your phone, please check your phone again. Some devices present the "Allow" button for several times. It doesn't matter. Just click it until it doesn't appear again or the program has begun its real scan.
Do not disconnect your device during the scan, or the scan will fail.

Step 4. Preview and recover
The scan will take you a while. After that, you can preview all recoverable data found in the scan result one by one. Actually, the current messages, contacts, photos, video and documents are also scanned out in the result. Deleted SMS and contacts are shown in red. You can separate them by the color.
After preview, mark those you want and click "Recover" to save them on your computer. As to contacts, you can save them in CSV, vCard or HTML format; to messages, save them in CSV or HTML format.
