

/https%3A%2F%2Fassets.over-blog.com%2Ft%2Ftwentyeleven%2Fimages%2Fpine-cone.jpg "Latest Tech News, Mac News, Android Devices, Popular Smart Phones, Camera and Camcorders and Useful Tips and Guides")
How to recover delete data from Samsung Galaxy Note 1/2
Published on July 25 2013
"How to recover deleted photos and videos from Samsung Galaxy Note 2? Hello, I need serious help here. I by mistake delete my data from Phone. "Camera Pictures" It was store in Phone memory not SD Card. Please help!"
Samsung Galaxy Note series are popular Android phones which come from the Samsung Galaxy series and includes smart phones with large screens and S Pens as well as tablets with the S Pen technology. Samsung Galaxy Note is ideal for taking pictures and recording videos.
However, you may sometimes deleted or lost your data by accident. Don't worry, you may still recover your lost messages, contacts, photos and video from your Samsung Galaxy Note with a program named Dr .Fone for Android.
Dr.Fone for Android is a comprehensive program for you to peform Samsung Galaxy Note data recovery. It enables you to recover lost or deleted files from Galaxy Note family devices with ease, including messages, contacts, photos and video. What’s even better, you can get a trial version to check and preview your lost files before recovery.
Step by step to recover deleted data from Samsung Galaxy Note
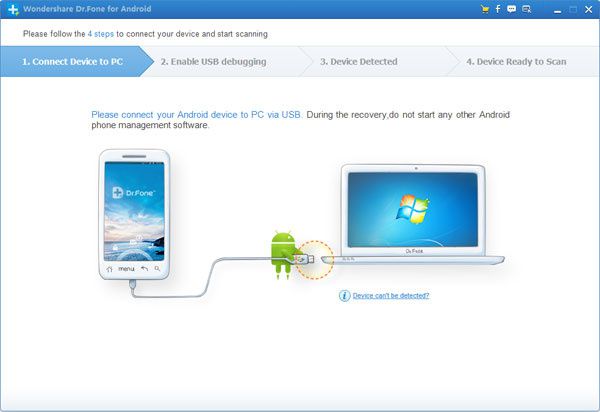
Download and install Samsung Galaxy Note to get the main interface shown below. Then connect your Samsung Galaxy Note to the computer
If you've enabled USB debugging on your device before, you can skip this step. If not, follow the way below to enable it. Three ways for devices with different Android OS.
1) For Android 2.3 or earlier: Enter "Settings" < Click "Applications" < Click "Development" < Check "USB debugging" 2) For Android 3.0 to 4.1: Enter "Settings" < Click "Developer options" < Check "USB debugging" 3) For Android 4.2 or newer: Enter "Settings" < Click "About Phone" trong>< Tap "Build number" for several times until getting a note "You are under developer mode" < Back to "Settings" < Click "Developer options" < Check "USB debugging"
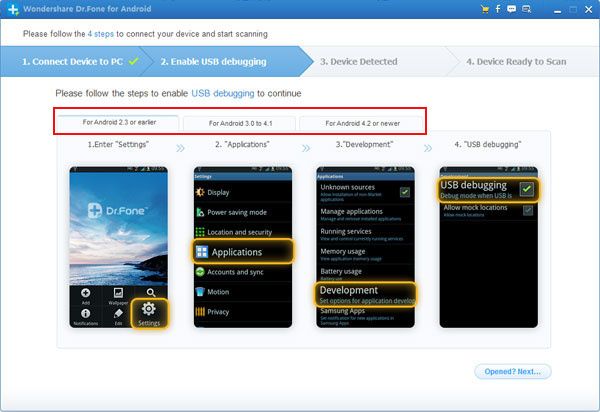
Note: If you've enabled USB debugging before, but still been stuck here, you can try to disable USB debugging and enable it again. Usually it works. Or you can click the button at the lower corner of the window: Opened? Next.... It also can direct you to the next step.
Before scan your Samsung Galaxy Note, the program need to analyze your device first. Click "Start" on the screen below. Then the analyzing will begin automatically.

Note: Before doing this, make sure that your phone battery is more than 20% charged, so that you can get a smooth scan
If your device is not rooted before, the program will directly scan it after the analysis.
Note: For the device that Wondershare Dr.Fone for Android doesn’t support currently, it may lead you to set USB Mass Storage on your device to scan photos, videos, music and documents, or to root your device by yourself (if there is no USB Mass Storage option). All rooted Android devices are supported well. You can choose to do it or not by yourself.
If you rooted your device before, you need to allow the program Superuser authorization on the screen of your device. Just click “Allow” when the message pops out on your device’s home screen. Then back to your computer, and click “Start” on the program’s screen to scan your device.
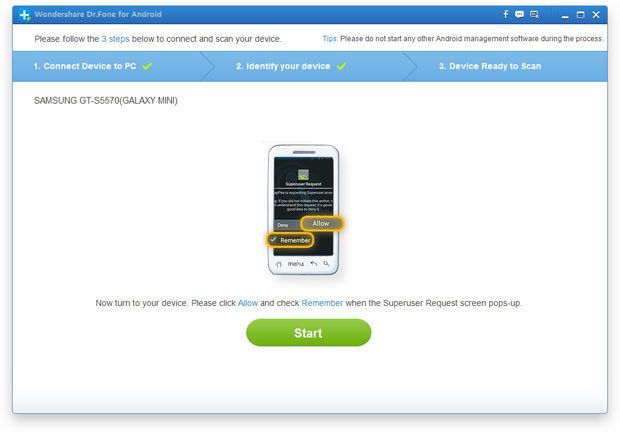
Note: For some devices, they may ask you to click “Allow” more than one time on your device’s homescreen. It’s normal. Just do it if it askes. It doesn’t matter. Just click it until it doesn’t appear again or the program has begun its real scan.
Do not disconnect your device during the scan, or the scan will fail.
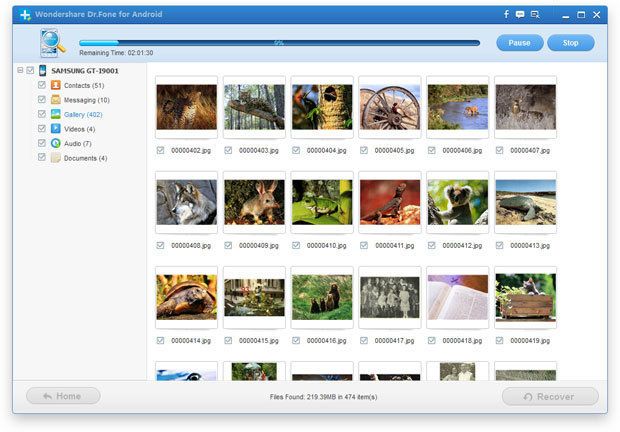
The scan will take you pretty a while, especially scanning photos and video. If your aim is at contacts and messages, you can stop the scan when the pop-up note telling that messages and contacts scan has been over. Then you can preview and check those recoverable data one by one. Choose them and click "Recover" to get them back.
