

/https%3A%2F%2Fassets.over-blog.com%2Ft%2Ftwentyeleven%2Fimages%2Fpine-cone.jpg "Latest Tech News, Mac News, Android Devices, Popular Smart Phones, Camera and Camcorders and Useful Tips and Guides")
How to create iPhone ringtones without sync with iTunes
Published on September 1 2013
"Is there an app i can make ringtones without syncing to itunes?.i wanna make ringtones straight from my iphone" --- Ask
iPhone is so powerful and popular, but the pity is that it do not support ringtone customization, users can not convert audio to iPhone ringtone but have to buy ringtone from iTunes store.
However, you can easy to find an aplication to help you make iPhone ringtones for your iPhone. And here, I'd like to share one of such programs for you. That's Xilisoft iPhone Ringtone Maker for Windows which can create your own iPhone ringtone from your favorite music or video without ever buying from iTunes Store.
Virtually all video/audio formats are supported - AVI, MPEG, WMV, DivX, MP4, H.264/AVC, AVCHD, MKV, RM, MOV, XviD, and 3GP plus audios like MP3, WMA, AAC, WAV, RA, M4A, and AC3.
With the smart iPhone ringtone maker, you can even transfer the converted file directly to your iPhone (iPhone, CDMA iPhone 4, iPhone 3G, iPhone 3GS, iPhone 4, iPhone 4S, iPhone 5) without going through iTunes.
Tips: If you want to make ringtone for iPhone via a Mac, you can turn toiPhone Ringtone for Mac.
Step by step to create iPhone ringtone on Windows
Step 1: Load a video/audio file
Click the "Select file(s)" button on the toolbar to select the file you want to create ringtone in the dialog that pops up, then click "Open" button. You can see the audio waveform in the grid area.

Step 2: Adjust the output settings
Enter the name in the "Output File Name" textbox or keep the original name, and click "Browse…" button on the right side of the "Output Folder" to choose a folder for saving the outputted ringtones.

Tip: After making ringtone, you can click "Open" button to view the ringtone directly.
Step 3: Customize the ringtone (optional)
1). Extract a clip
Click "Play" button to listen the music and find the part you want. Drag and drop the start & end line to get a music clip, or click "Set the current time as the start point" and "Set the current time as the end point " buttons to extract a clip, or type the start & end time directly in the corresponding text boxes.

2. Add fade-in and fade-out effects
Check the "Fade in" and "Fade out" checkboxes, and set the fade-in and fade-out time according to your need.

3. Adjust ringtone volume
Click “Output volume” drop-down button to set the ringtone volume freely.
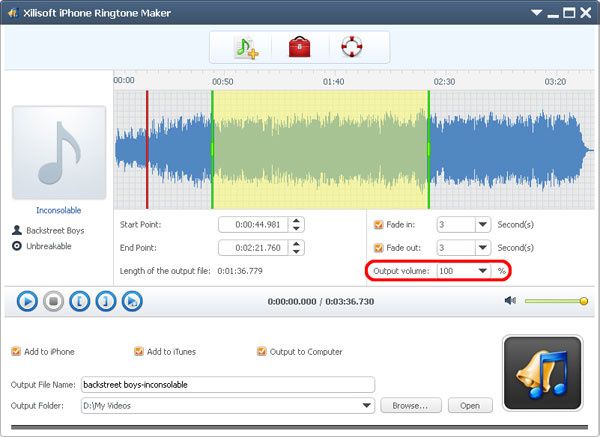
Step 4: Adjust the file transfer settings
If you want, check "Add to iTunes" and "Add to iPhone" options to let the program upload the ringtone to iTunes and your iPhone directly after conversion.
Click "Ringtone Manager" button on the toolbar to manage all the ringtones you uploaded to iPhone in the "Ringtone Manager" dialog that opens.

Choose an audio file in the file list, click “Export to iTunes” or “Export to PC” button to exporting files. You can also click “Rename” button to rename the audio file.

Step 5: Start making ringtone
After all above are finished, click "Start Converting" button to start to make your own iPhone ringtone. You can check the converting process from the progress bar at the bottom. Just in a few minutes, you make your own iPhone ringtone from the loved music.
