

/https%3A%2F%2Fassets.over-blog.com%2Ft%2Ftwentyeleven%2Fimages%2Fpine-cone.jpg "Latest Tech News, Mac News, Android Devices, Popular Smart Phones, Camera and Camcorders and Useful Tips and Guides")
I Fixed My Broken iPhone Screen, and You Should Too
Published on December 13 2017
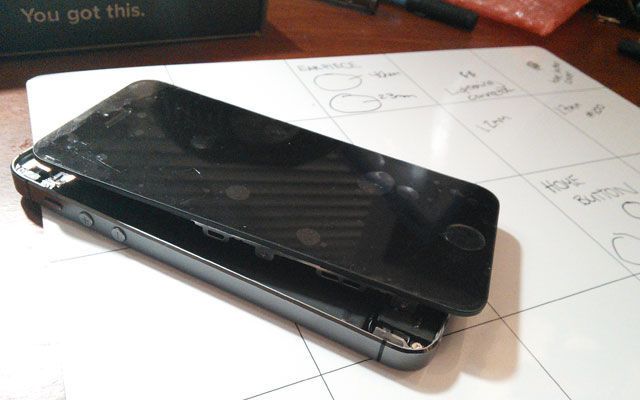
I'd like to say I was surprised when I shattered the screen of my iPhone 5S, but that screen had it coming. It had endured countless run-ins with sidewalks and tile floors and a few accidental acrobatic trips across the room. Finally, it was a 2-foot drop onto my driveway that did in the display.
Sure, you could use a broken iPhone as an opportunity/excuse to go ahead and upgrade to the iPhone 6. You can have Apple fix your device—which isn't cheap. If you don't have Apple Care (I don't now), pricing for an iPhone 5S screen replacement at the store is $269 [Editor's note: Apple has changed its pricing and will now do a 5S screen replacement for $129]. With Apple Care+ for iPhone (which costs $99 up front), you're looking at $79 per replacement.
Or, you can fix your screen at home on your own. For $94.95, iFixIt currently sells kits with the parts (iPhone 6 parts not available yet!) and all the tools you need to replace the screen at home on your own. Online, there's a step-by-step guide to handling the process and even a video to guide you. So, I gave it a shot.
To take apart your iPhone you need to have an arsenal of tools. Specifically, a Phillips #000 screwdriver, Pentalobe iPhone screwdriver, tweezers, a spudger, and a plastic tool to crack the thing open. If you do any electronics work, then you probably own a few of those already, but some are speciality items.
The iFixIt kit comes with most of them, including a suction cup attached to a keyring for pulling your screen up. It works, and if you think this will be your only gadget-repair rodeo, then it'll do. However, if butterfingers runs in your family, you might want to consider investing in an iSclack. It's essentially two suction cups on an apparatus that makes opening your phone easier and ensures that you don't pop the screen off too fast and damage the inside.
I also had a more extensive toolkit on hand and found myself frequently grabbing for those tools over the ones included in the repair kit—especially the tweezers, which aren't included in the iFixit kit but are definitely something you'll want.

The first step in any iPhone repair is unscrewing the two small screws beside the Lightning connector. Once that's done, you pop the top off your phone using the suction cup device that came in the kit. My screen was so cracked when I started to hit it with the suction cup, I couldn't get a good seal. The few times I got a partial seal I pulled up small pieces of glass. It was bad. A massacre even. Pulling up the screen took around 30 minutes. In the end, I succeeded only because I managed to wedge the plastic opening-tool iFixIt sent along under the base.
Be as gentle as possible during this step. The home button is attached at the bottom of the phone near where you're pulling. Pull too hard and you could permanently damage the cable.

Taking apart your iPhone is ... surprisingly easy. Yes, there are a ton of parts, and they're small. But actually removing them all isn't difficult. I used a magnetic board from iFixit to keep all my parts together, which is a must-have if you plan to tackle this kind of repair. Any container with a good number of compartments you can label should do the trick.
Did I mention these screws are small? My magnetic board let me write on it exactly what screws went where and belonged to what, which was crucial information when it came to putting everything back together. The screws that are part of the logic board assembly in particular are a bit tricky. They look the same, but if you mismatch them, you run the risk of destroying the logic board in your phone. You want to keep these bad boys labeled.
Once you're inside, dismantling an iPhone is more patience than technical know-how. You need to take out a substantial amount of screws and remove the home button assembly, earpiece, ambient-light sensor, and back plate. IFixIt also recommends peeling some of the top assembly off from the plate. I did this when I took apart my phone (with the help of a hair dryer to heat up the adhesive) but later realized it was totally unnecessary. Since you're putting the back plate on your new screen, there's no need to pull it off or experience the general terror involved with doing so. That copper sticker is difficult to remove, and oh-so-delicate. If you're attempting your own repair, leave it on.
Once you've got everything taken apart, it's time to put it all back together. Luckily, since you've done the teardown process, the reassembly is a breeze. I was able to get everything put together and my new screen on in under 15 minutes. Easy peasy.
After everything was screwed back together, I plugged my phone in, pressed the power button and … nothing. Nothing happened. The screen wouldn't turn on.
My first thought when my screen wouldn't turn on: "What did I f*ck up?" I took the phone apart again and repeated the repair a dozen or so times. When that didn't work, I posted about my predicament in iFixIt's online forums. A few responses trickled in, and I chatted via email with a member of the iFixIt team. No matter what troubleshooting tip I tried, the screen still wouldn't work. This being my first attempt at doing the repair, it was impossible to tell whether I had done something wrong or had just gotten a bad part.
After 20-plus attempts and no working screen, it was time for reinforcements. I took my phone to a Batteries+Bulbs location in San Francisco, where a tech who does frequent iPhone repairs kindly agreed to check my work. Turns out, I'd done everything correctly, but the original screen I'd gotten was faulty or had become damaged. He put on an extra screen the store had on hand, and voilà, my 5S was up and running.
Interesting to note: The technician's tools and the screen he used looked identical to the ones I was using at home (though he had an iSclack for opening the phone). Technicians also work with instructions by their side—instructions that again looked shockingly similar to what I had at home. As far as methodology, we did the exact same thing.
One thing he had that I didn't: parts. Lots of them. When my screen didn't work, I couldn't just try a new one. If I lost a screw along the way, I was screwed. I'm now sure the faulty new screen I got was just bad luck, but when you're doing a repair at home, it's hard to test whether it's your hardware or handiwork that's bringing you down.
Next time I break my iPhone screen (because let's face it, there will be a next time—I just got the 6), I'm probably going to order a repair kit and DIY it. Honestly, after repeating the steps a couple dozen times, I'm so confident with the repair process that I'd probably offer to do it for friends for free. Cracking open an iPhone is intimidating at first, but if you have ample patience (and a magnetic mat), it's a fairly easy process. I could finish the fix in 30 minutes or less.
(Note: If you broke your iPhone 6 in the first week, then you're out of luck for going the DIY route—the kits aren't available just yet.)
Still, given the time it took me on my first go-round, I can safely say that gadget repair is not for everyone. If you can't dedicate a few calm hours to the process, or struggle working with small things, then you're probably better off taking your phone to a repair shop or the Apple Store and having them do it for you. You might pay a bit more, but you're guaranteed a product that's going to work.
Article Source: I Fixed My Broken iPhone Screen, and You Should Too